
Operation Buttons
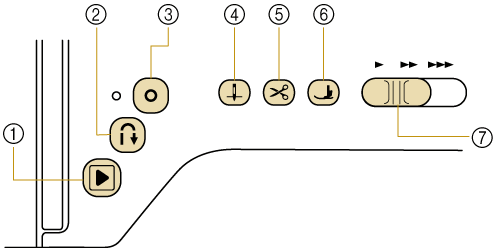
- “Start/Stop” button

Press the “Start/Stop” button to start or stop sewing. The button changes color according to the machine’s operation mode.
Green: The machine is ready or is operating.
If the button flashes green slowly, the machine enters the power saving mode. (Setting the Power Saving Mode)Red: The machine is not ready. Orange: The machine is winding the bobbin thread, or the bobbin winder shaft is moved to the right side. - Reverse stitch button

Press the reverse button to sew reverse or reinforcement stitches depending on the selected stitch pattern.
- Reinforcement stitch button

Press the reinforcement button to sew a single stitch repeatedly and tie-off.
For character/decorative stitches, press this button to end with a full stitch instead of at a mid-point.
The LED beside the button automatically lights up while the stitch is being sewn and goes off when sewing is finished.
Reverse/Reinforcement stitches are generally necessary at the beginning and end of sewing.

- Reverse stitch
- Reinforcement stitch
- Needle position button

Press the needle position button to raise or lower the needle position. Pressing the button twice sews a single stitch.
- Thread cutter button

Press the thread cutter button after sewing to automatically trim the excess thread.
- Presser foot lifter button

Press the presser foot lifter button to lower the presser foot and apply pressure to the fabric. Press this button again to raise the presser foot.
- Sewing speed controller
Use the sewing speed controller to adjust the sewing speed. Move the slide to the left to sew at slower speeds. Move the slide to the right to sew at higher speeds.