
Embroidering Attractive Finishes
Many factors are involved in achieving a beautiful embroidery result. Using the appropriate stabilizer and hooping the fabric in the frame are two important factors mentioned earlier. Another important point is the appropriateness of the needle and thread being used. See the explanation of threads below.
Attaching Iron-on Stabilizers (Backing) to the Fabric
Hooping the Fabric in the Embroidery Frame
Thread | Upper thread | Use embroidery thread intended for use with this machine. |
Bobbin thread | Use the included embroidery bobbin thread or recommended embroidery bobbin thread. |
If you use threads other than those listed above, the embroidery may not embroider out correctly.
Bobbin case (recommended for sewing and for embroidering with included 60 weight bobbin thread)
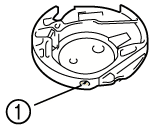
- Standard bobbin case (green marking on the screw)
Standard bobbin case originally installed in the machine has a green marking on the screw. We recommend using the included embroidery bobbin thread with this bobbin case. Do not adjust the tension screw on this bobbin case with the green marked screw.
Bobbin case (for prewound or other embroidery bobbin threads)
- Bobbin case (no color on the screw)
The bobbin case with no color on the screw is set with tighter tension for embroidery with different weights of bobbin threads and a variety of embroidery techniques. This bobbin case is identified with a dark colored mark on the inside of the bobbin cavity. The tension screw on this case can be adjusted if necessary.
 CAUTION
When embroidering on large items (especially jackets or quilts), do not let the fabric hang off of the table. Otherwise, the embroidery unit cannot move freely and the embroidery frame may strike the needle, causing the needle to break and possibly causing injury.
Embroidery Needle Plate Cover
Under some conditions, based on the type of fabric, stabilizer, or thread being used, there may be some looping in the upper thread. In this case, attach the included embroidery needle plate cover to the needle plate. Attach the cover by inserting the two projections on the underside of the cover into the notches on the needle plate as shown below.
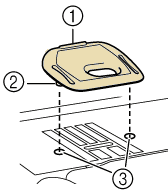
- Groove
- Projection
- Notch
To remove the embroidery needle plate cover, place your fingernail in the groove and lift the plate out.
 CAUTION
Push the embroidery needle plate cover as far as possible to attach it. If the embroidery needle plate cover is not securely attached, it may cause the needle to break and cause injury.