
Sewing Screen
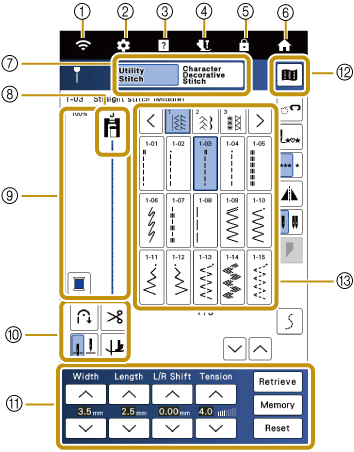
- Wireless LAN key
Shows the machine’s signal strength. Touch this key to specify the wireless settings. If there is a new update file, the key appears as
 .
. - Settings key
Customize the various machine settings.
- Machine help key
See explanations on how to use the machine. You can see the instructional videos by scanning the QR code displayed on the Help screen.
- Presser foot/Needle exchange key
Touch this key before changing the needle, the presser foot, etc. This key locks all key and button functions to prevent operation of the machine. Touch this key again to unlock all keys and buttons.
- Screen lock key
Lock the screen. When the screen is locked, you can still sew, but cannot change any of the screen functions. Touch this key again to unlock the screen.
- Home screen key
Show the home page screen at any time.
- Stitch tab
Select a stitch pattern from utility stitches or custom character/decorative stitches.
- Presser foot
Shows the presser foot to be used for the selected stitch pattern.
- Stitch preview
Shows the preview of the selected stitch pattern.
- Functional keys
Touch the key to use the automatic reinforcement stitching (reverse stitching) setting, automatic thread cutting function, needle stop position to be up or down or pivot function.
- Stitch adjustment area
Shows the stitch width, the stitch length, “L/R Shift” (the stitch position), and the thread tension of the selected stitch pattern. You can also adjust them by using the keys.
- Image key
Display an enlarged image of the selected stitch pattern.
- Stitch selection area
Select a stitch pattern.