
Utility Stitches
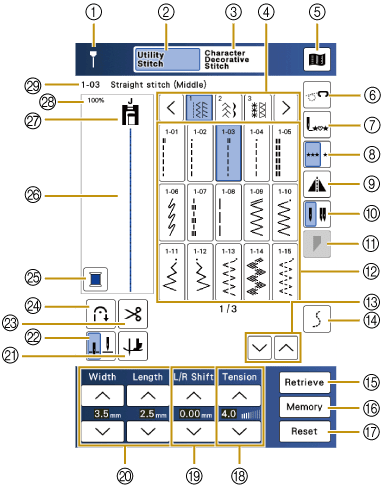
- Some editing functions cannot be used with certain stitch patterns. Only the functions for the displayed keys are available when a stitch pattern is selected. If the key display is grayed out, you cannot use that function or operation.
- The machine default setting is highlighted.
- Guideline marker key
Shows the status of the external guideline marker. When the marker is attached, touch this key to turn the guideline on or off. The guideline marker makes it easier to align stitches with the fabric edge or other marks on the fabric.
- Utility stitch key
Select a straight stitch, zigzag stitch, buttonhole, blind hem stitch, or other stitch (utility stitch) commonly used in garment making.
- Character/Decorative stitch key
Select character or decorative stitch patterns.
- Category keys
Select the category of the stitch.
Touch or
or  to view other categories.
 Straight/Overcasting
 Decorative Stitches
 Heirloom Stitches
 Buttonholes/Bar tacks
 Multi-directional
 Sewing Quilting Stitches
 Stitch Tapering
 - Image key
Display an enlarged image of the selected stitch pattern.
Touch to change the thread color in the image.
To display the enlarged image, touch .
.
To view any part of the image that extends out of the viewable display area, touch /
/  / / .
/ / . - Free motion mode key
Enter free motion sewing mode.
The presser foot is raised to an appropriate height and the feed dog is lowered for free motion quilting. - Back to beginning key
When sewing is stopped, touch this key to return to the beginning of the stitch pattern.
- Single/Repeat sewing key
Select single stitches or continuous stitches.
- Horizontal mirror image key
Create a horizontal mirror image of the stitch pattern.
- Needle mode selection key
Select a needle mode (single/twin).
- If a key display is grayed out, you cannot use that function with the selected stitch pattern.
- Stitch tapering key
Change the start and end angles of the stitch pattern.
Stitch Tapering Function (Changing the Start and End Angles of the Stitch Pattern)
- Stitch selection area
Select a stitch pattern.
- Page key
Touch
 or
or  , to move the pages of stitch selection area.
 - Curve sewing key
Set the function to assist with curve sewing.
- Retrieve key
Retrieve a saved stitch pattern.
- Manual memory key
Change the stitch pattern settings (zigzag width and stitch length, thread tension, etc.), then save them by touching this key. Five sets of settings can be saved for each stitch pattern.
- Reset key
Return the stitch settings to the default.
- Thread tension
Shows the thread tension setting of the currently selected stitch pattern. You can use
 and
and  to change the thread tension settings.
 - “L/R Shift”
Touch
to shift the stitch pattern to the right or touch to shift the stitch pattern to the left. This feature is not available for all stitch patterns. Only those applicable will be shifted. - Stitch width and stitch length
Shows the zigzag width and stitch length settings of the currently selected stitch pattern. You can use
and to adjust the zigzag width and stitch length settings. - Pivot key / Auto up key
Touch this key to automatically raise the presser foot when the machine is stopped.
While the pivot function is turned on, the presser foot is automatically lowered when sewing is restarted. - Needle stop position setting key
Touch this key to select the needle stop position to be up or down.
You can also check the needle mode setting (single or twin). Single needle/down position
 Twin needle/down position
 Single needle/up position
 Twin needle/up position
 - Automatic thread cutting key
Turn on this function to set the machine to automatically trim the threads at the end of stitching.
- Automatic reverse/reinforcement stitch key
Turn on this function to set the machine to automatically sew reinforcement stitches at the beginning and end of sewing (depending on the stitch pattern, the machine may sew reverse stitches).
- Thread color change key
Change the thread color in the image.
- Stitch preview
Shows an image of the selected stitch. When shown at 100%, the stitch appears in the screen at nearly its actual size.
- Presser foot
Shows the presser foot to be used. Attach the presser foot indicated here before sewing.
- The symbols for certain presser feet, such as zipper foot “I”, may not appear in the screen.
- Stitch pattern display size
Shows the approximate size of the image of the stitch pattern selected.
The percentage changes depending on the size of the selected stitch pattern. - Stitch name
Shows the stitch number and name of the selected stitch.